leanstead

leaning up to focus on faith and simple life

  • About
  • Faith
  • Simple life
    • Creating Home
    • Homesteading
      • Chickens
      • Pigs
    • Health
      • Diabetes
  • Recipes

Easy Hack to Save Time and Money in the Kitchen

04.13.2021 by hope // Leave a Comment

ONE chicken and FOUR meals

Looking for an easy hack to spend less time and money in the kitchen and more time outdoors? Make this approach to meal planning part of your spring schedule.

Spring is in the air and if you’re like me, you just want to be outside. I mean, like ALL THE TIME. Spending time outdoors doesn’t mean we have to sacrifice good food to be outdoors. We also don’t have to rely on the drive through for quick meals. We just need to practice planning out our time and our meals. Preaching to myself here!

Recently, I’ve taken full advantage of this easy hack for meal planning. It has freed up a lot of time plus it saves us money. That hack is taking advantage of an instant pot and a whole chicken. Preparing a whole chicken on Monday allows me to use that meat to create at least four evening meals. This lasts us throughout the week.

Prepare your chicken

Begin with preparing a whole chicken in your favorite way. This can be in an Instant Pot, slow cooker or roasting in the oven. Personally, I love the flavor of roasted chicken. But since we raise our own heritage breed chickens, they tend to have less fat on them. I’ve learned that the best method for our chicken is in the instant pot. My recommendation, though, is to use the cooking method that blesses you most. It may not sound like it, but this investment is truly going to save you time and money. You can check out my process for preparing a chicken here.

dish with cooked chicken next to a instant pot
A little time spent on preparing this one meat can save you time and money throughout the week.

I generally like to make the chicken versatile for other recipes. So I prepare my chicken by brushing with olive oil and sprinkling salt, pepper and garlic powder. Then I place it in the instant pot with half a cup of water in the bottom of the pot. I then set my instant pot on pressure cook mode and cook for two hours. Depending on the breed of chicken, you could probably lower your cooking time. However, I find that two hours gives me a well cooked chicken with meat that literally falls off the bones.

Allow the chicken to cool about twenty minutes so you don’t burn yourself while handling it. Once it is comfortable to the touch, start to pull the meat away from the bone and place it in a separate container. Generally, I begin with pulling the breast meat sections off first, then move on to the thighs, legs and wings.

Once you have all removed the meat, make a batch of bone broth with the leftover bones and chicken parts. Here you can find more about the benefits of bone broth and how to make it. This can be used to sip hot for a spring morning boost, as a base for soups or as a liquid for sauces.

One bird, four ways

Now that you’ve got your meat set aside, visually divide it into four sections. Typically, this will mean meat from legs and wings, thighs and then the two breast for four separate meals.

First night

square plate with bbq chicken and sides
Chicken with barbecue sauce served with deviled eggs, slaw and macaroni and cheese.

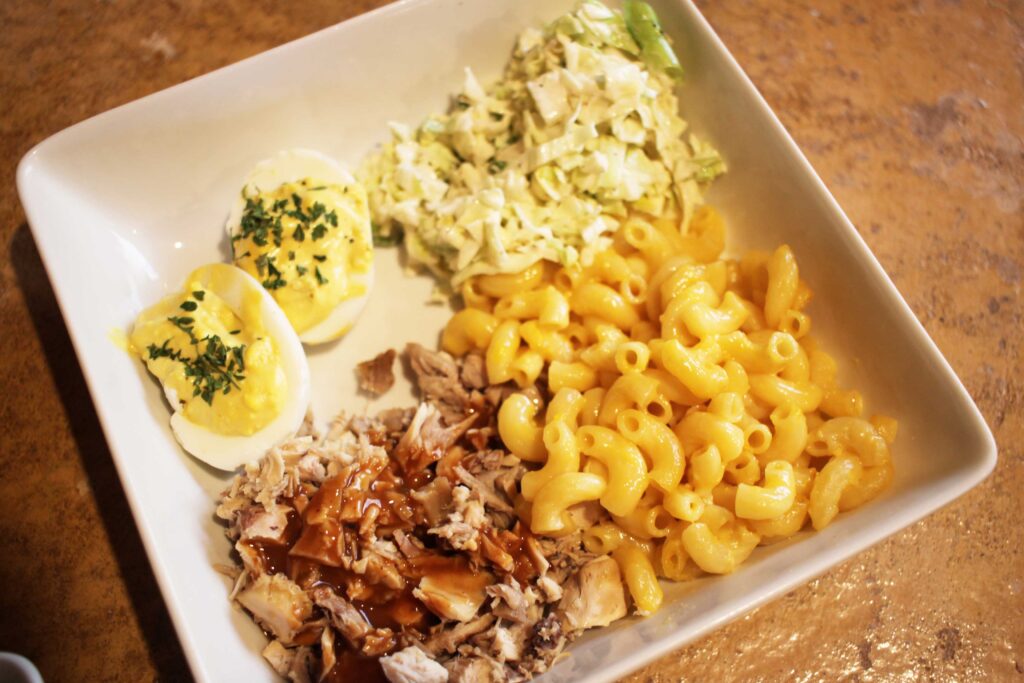
On the first night, my usual meal will be the chicken on it’s own and topped with barbecue sauce. I pair it with some veggies. Here I chose mac and cheese, slaw and deviled eggs. This is a bit more than I would typically make for a Monday night. I just happened to have some boiled eggs leftover from the weekend.

Second night

two bowls of chicken pot pie
Chicken pot pie is a great one pot dish.

The second night was a bit chilly. So I sautéed my chicken with some carrots, peas and mushrooms. Then I added a pie crust topper and created a chicken skillet pie.

Third night.

Night three had me longing for some pasta. I sautéed some carrots, mushrooms and peppers along with the chicken, created a sauce and then added spaghetti. Topped off with a sprinkle of parmesan, it was delicious.

Pasta salad with chicken is always a hit at our house.

Fourth night

On the last night, I used the remaining chicken breast. I chopped it along with some apple, celery and walnuts to make a chicken salad. I coupled it with a large green salad and crackers.

plate of salad and chicken salad
A scoop of chicken salad and green salad

More ideas

If those four dishes don’t seem to fit your taste, never fear. Here are some additional options for using that chicken and stretching your time and money.

  • chicken noodle soup
  • curry chicken and rice
  • chicken stir fry
  • quinoa salad with chicken
  • chicken and dumplings
  • tortilla soup
  • chicken casserole
  • chicken tacos
  • chicken sandwiches
  • chicken flat bread pizzas
  • baked potatoes topped with bbq chicken (load it up with peppers and cheddar)
  • chicken tetrazzini

No time to cook that chicken? No problem.

Are dealing with an already packed schedule and don’t even have the time to cook that chicken? No problem. There are always even more short cuts. Almost all grocery stores now have rotisserie chickens available in their deli section. This is a great way to get the benefit of multiplying that bird, but in even less time.

Now get out there and enjoy this gorgeous weather, knowing dinner is in the bag!

Categories // Recipes Tags // chicken, frugal, recipes, simple living

Healthy bone broth: Why you should make some now

03.27.2021 by hope // Leave a Comment

Healthy homemade bone broth is super simple to make and can be so useful and beneficial. You’ll wonder why you never knew about this old homesteading staple.

instant pot with bones and juices

If you are like me not so long ago, you may have never made your own bone broth or even be sure you know what it is. That’s okay and all the more reason to continue being a lifelong learner. It was just a few years ago that I started to read and begin to understand the just how powerful good food can be for us and the healing power it holds. At the time of my dad’s pancreatic cancer diagnosis, I was on the search for ways to help with his nutritional needs. I discovered an excellent cookbook for cancer patients and those caring for them.

The biggest takeaway from that book, though, was healthy bone broth. Over the years, it has gradually become a staple in my kitchen and now that we are raising our own chickens, I have established an easy routine of preparing a whole chicken each week and using the bones from that chicken to make a batch of delicious and nutritionally dense bone broth.

Benefits of bone broth

1- Helps with digestion issues. Many people suffer from leaky gut and other digestive issues which can be helped by the gelatinous elements of bone broth. This element of bone broth helps to ease the discomfort of damaged lining of the digestive tract.

2. Boosts your immune system. Bone broth is almost like a superfood for a weakened immune system. Because the main ingredient in this liquid gold is bones and the marrow that is steeped from them is a great source of nutrients and vitamins.

3. Great source of amino acids. Bone broth contains several different amino acids including proline which is great for helping to reduce wrinkles. Hey! That should motivate many of us women to plop a chicken in a pot for a day or so. These amino acids are also great for heart health.

4. Promotes joint health. Bone broth contains glucosamine which can be a big help keeping your joints pain free. This is probably my husband’s favorite reason to sip on bone broth.

white mug of broth next to notebook, pen and tray
Hot bone broth soothes achy joints

Additional uses for bone broth

While one of the most popular ways to consume bone broth is simply by the cup, there are also many great uses in the kitchen. Here are just a few:

  1. Use as a base for soups and stews. Many recipes will call for water or stock, but bone broth is a sure way to beef up the nutritional score of any recipe.
  2. Use as the liquid for gravy and sauces. Many recipes will work to substitute bone broth for other liquids.
  3. Use in the place of water for cooking rice. You’ll get instant flavor, not to mention better nutrition.
  4. Add to leftover dishes as you reheat them either in the oven or on the stovetop to keep them from drying out. Sometimes rice or pasta dishes need a little extra liquid and this is a great way to boost the flavor and the minerals.
Making bone broth is simple and a great way to save you time while building a healthy body

It’s as simple as this

Making healthy bone broth is very simple using an instant pot or slow cooker, but you can also use a regular stock pot on the stovetop. All you need to do is toss a few ingredients into a pot, top with water and your favorite leftover raw veggies like carrots, celery, onion and garlic. I recommend simmering the broth for at least 12 hours, but the longer it simmers, the more nutritionally dense your broth will be. I aim to keep the pot simmering for 24-48 hours.

instant pot with bones and veggies
adding water to instant pot of bones and veggies
Ingredients are few but they pack a punch.

Once you have reached your desired time, allow the pot to cool a bit and prepare several jars to store your bone broth. I usually end up with one half gallon jar plus an additional quart size jar of broth. Place a strainer inside a funnel over the top of the first jar and ladle the liquid into the strainer. You can speed the process along by scooping out the larger bones and vegetables in advance. This process takes about five minutes and the reward is great!

Sip from a cup (add salt to taste) or add to your favorite recipes. You’ll love knowing you have done something great for your family!

Looking for ways to use that chicken meat? Check out these ideas here.

Enjoy!

Categories // Creating Home, Health, Homesteading, Recipes, Simple life Tags // health, homesteading, recipes

Simple Fluffy Biscuits from Scratch

03.23.2021 by hope // Leave a Comment

Simple fluffy biscuits made from scratch are a favorite for most anyone. Right? If you’ve been intimidated by the mess and lack of confidence, you have to try this one out!

biscuits on a making sheet

Making biscuits used to overwhelm me

When Michael and I married, he didn’t exactly get Martha Stewart as a homemaker. I was fully capable of preparing hot food for us and thankfully he was very easy to please. In fact, he was the kind of college student that could make a monster batch of mac and cheese with ground beef for protein and be happy to eat it all week. This was probably the best thing I had going for me as a young wife. You see, I was the oldest of four children. So, I had grown up helping prepare meals for a family of six. This resulted in me always making way too much food for two people. Thankfully, Michael had no problem eating the same thing for several meals in a row.

One thing that he did love, though, and never got, was good ol’ southern fluffy biscuits from scratch. No ‘whamp biscuits’ would do (you know, the kind in a can that you whamp on the counter top to open?). His grandmothers and aunts were all excellent cooks. You know the type that never measured anything. During visits with them in the kitchen, Michael tried his best to write down their recipes and follow their instructions. It just never worked. He didn’t have their ability to ‘just know’ how much of each ingredient to add. So his attempts fell flat.

When our daughter was twelve years old, she decided to give her dad the best Christmas present ever! A plate of homemade biscuits. At the time, she was baby-sitting for a family blessed with a wife who knew all the things in the kitchen. Kaley swapped her services for baking lessons and learned to make biscuits from scratch for her dad. How precious is that? He LOVED it!

Well, Kaley grew up and moved away to finish school and with her went those weekend biscuits. 

I finally stepped up my game

Eventually, I decided that biscuits were worth the mess on my kitchen counters. I began my own journey to find a simple recipe for fluffy biscuits from scratch. Here I am sharing the result of that adventure. 

This recipe is a mixture of several that I have tried over time. I am pleased to say that it is easy and isn’t all that messy. Plus, the ingredient list is short:

Ingredients:

2 cups flour

1 ½ tbsp baking powder

¼ tsp baking soda

½ tsp salt

½ cup butter (cold and diced)

1 cup buttermilk

Instructions:

Start by preheating your oven to 450 degrees.

Step 1: Dice your butter into small cubes and place it in the freezer for a few minutes. This will assure that it is super chilled.

Step 2: In a large bowl, add the 2 cups of flour (I use all purpose flour). To that, add 1 ½ tablespoons baking powder, ¼ teaspoon baking soda and ½ teaspoon salt. Mix thoroughly with a fork or whisk. 

Step 3: Combine the cold butter with the dry flour mixture and incorporated it into the mixture. I use a pastry blender for this step, but you could also simply use a fork.

Step 4: Add your buttermilk to the bowl and mix with a fork or spoon until it is combined. The batter will still be sticky and clumpy. 

Step 5: Dust the surface of a cutting board or a clean countertop. Now scoop your biscuit mixture out onto the surface. Dust the top of the mixture as well as our hands with more flour. Now shape the dough into a square roughly an inch in thickness. 

Step 6: Now start forming your biscuits. You can either use a biscuit cutter (or a glass) to cut out circles. You can also divide the mixture by cutting and separating into eight or so sections. I cut my square into nine sections and form each little square into a round biscuit. 

Step 7: Place your biscuits in a cast iron skillet (or a parchment lined baking sheet). They should be almost touching, and brush the tops with additional buttermilk. Place in your preheated oven and bake for 12-15 mins. Remove from oven when they are golden on top. 

Tips

  • If you don’t have buttermilk, you can make your own by adding a tablespoon of white vinegar to regular milk. Allow it sit for a few minutes and it will begin to curdle.
  • Avoid using your hands to combine the butter and dry mixture. This will keep the butter from getting warm.
  • Don’t have a skillet? You can also use a baking sheet or even a glass casserole dish that is lined with parchment paper.
Yield: 8-9 medium size biscuits

Simple Fluffy Biscuits from Scratch

biscuits on baking sheet

Easy, fluffy biscuits from scratch that will please any family.

Prep Time 10 minutes
Cook Time 12 minutes
Total Time 22 minutes

Ingredients

  • 2 cups flour
  • 1 ½ tbsp baking powder
  • ¼ tsp baking soda
  • ½ tsp salt
  • ½ c butter
  • 1 c buttermilk

Instructions

  1. Dice your butter into small cubes and place it in the freezer for a few minutes so that it is super chilled.
  2. In a large bowl, add the flour, baking powder, baking soda and salt. Mix thoroughly with a fork or whisk.
  3. Add the cold butter to the dry flour mixture and incorporated it into the mixture using a pastry blender or fork.
  4. Add your buttermilk to the bowl and mix with a fork or spoon until it is combined. The batter will still be sticky and clumpy.
  5. Dust the surface of a cutting board or clean countertop and scoop your biscuit mixture out onto the surface. Dust the top of the mixture as well as our hands with more flour. Now shape the dough into a square roughly an inch in thickness.
  6. Now you can start forming your biscuits. You can either use a biscuit cutter (or a glass) to cut out circles or you can divide the mixture by cutting and separating into eight or so sections. I cut my square into nine sections and form each little square into a round biscuit.
  7. Place your biscuits in a cast iron skillet almost touching, and brush the tops with additional buttermilk. Place in your preheated oven and bake for 12-15 mins. Remove from oven when they are golden on top.
© hope
Cuisine: Southern

Categories // Creating Home, Recipes, Simple life Tags // creating home, recipes

Thanks for stopping by!

woman face shot

Hi there! I’m Hope and the voice of this blog. I’m a Christ and coffee loving wife and mom to two great (and now grown) humans. Join me as my husband  Michael and I journey to leaning up life so that we can focus on the important. Read more here

Recently posted

three wool dryer balls next to laundry detergent

7 Environmentally Friendly Ways to Reduce Waste in our Home

Ways to Become More Environmentally Conscious We are told that we need to be more environmentally conscious, but some habits are hard to break. Or are they? Here I share seven environmentally friendly ways we have reduced waste in our home over and some surprising results. It’s Been a Journey No good or real change […]

Leanstead Community

Copyright © 2023 · Modern Studio Pro on Genesis Framework · WordPress · Log in